How to Crop an Image Into a Circle (With Transparent Edges)

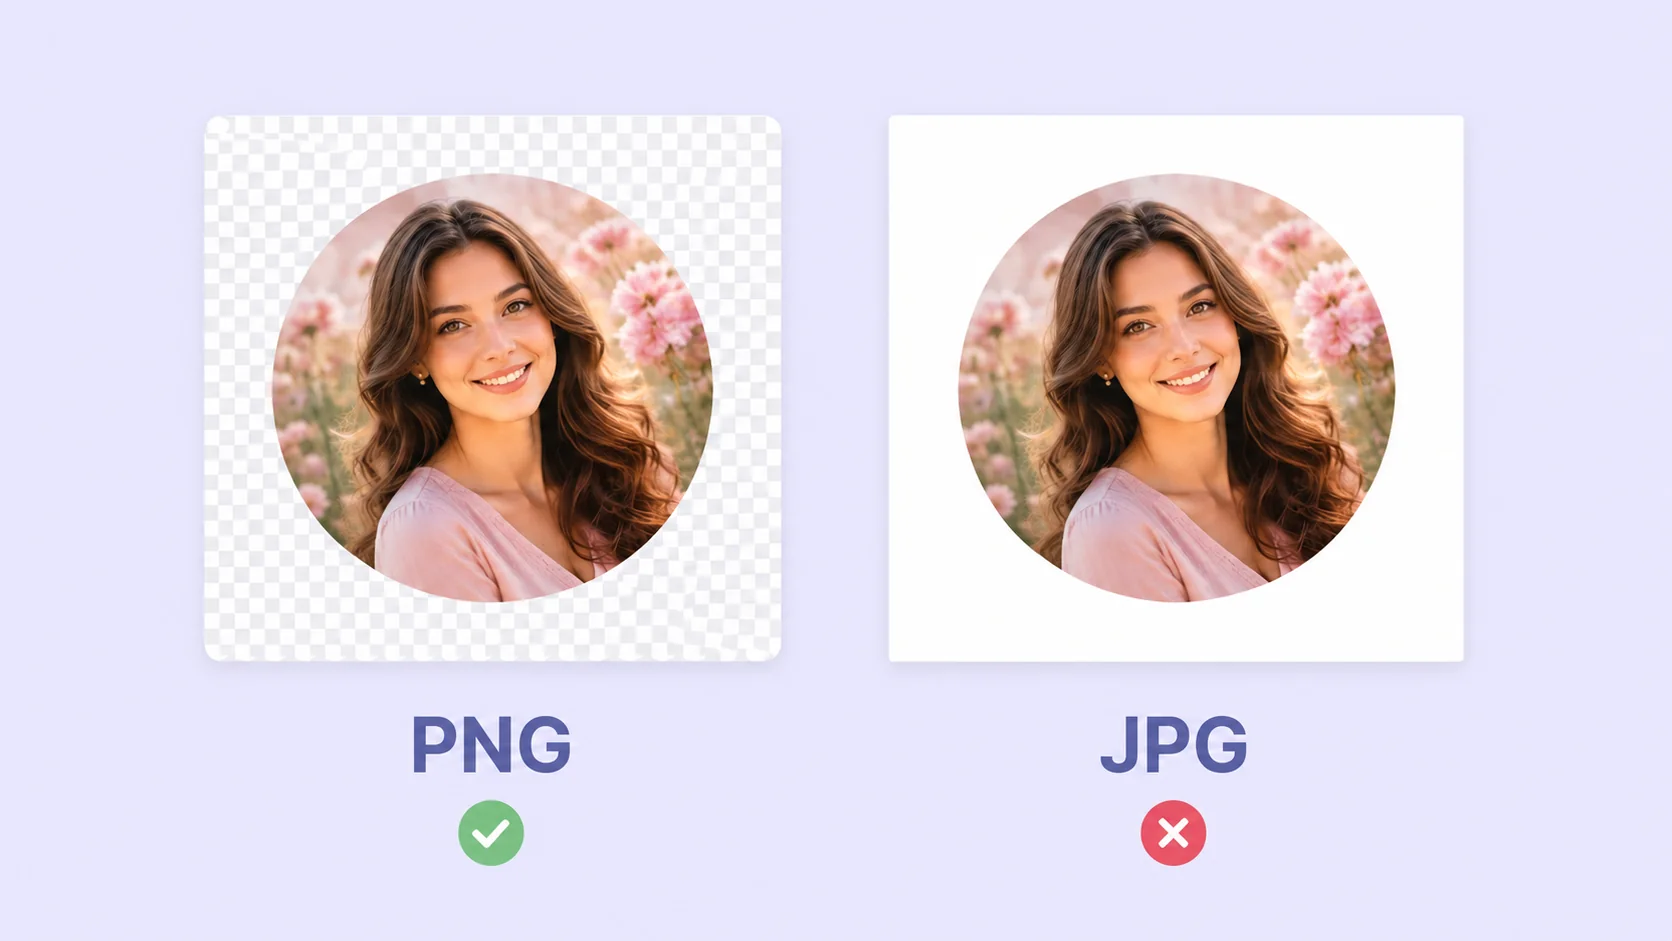
To crop an image into a circle you need two things, and most guides only mention the first: a round selection, and an export format that can hold transparency. Miss the second and your beautiful circle arrives wrapped in a white or black square, which is the single most common complaint about round crops and the reason this guide spends real time on it.
Below: the five-step process, the format rule that keeps corners invisible, current profile picture sizes for every major platform, and the framing habit that stops circles from cutting off the top of people’s heads.
How to crop an image into a circle in 5 steps
- Start with a square-ish image. Circles crop from squares, so a very wide or very tall photo loses a lot. If yours is panoramic, crop it roughly square first so you control what survives.
- Open the ArtsFlick crop tool and choose the circle shape. The round frame appears over your photo.
- Position and size the circle. Drag to move, use the handles or zoom to resize. Put your subject’s eyes slightly above the circle’s center; more on why below.
- Export as PNG. This is the step that matters. PNG keeps the corners transparent; JPG cannot, and will fill them.
- Check it on a colored background. Drop the file onto a dark surface or a colored slide. If you see square edges, the export format was wrong, not the crop.
Whole thing takes under a minute once you know the shape of it, and the tool runs in your browser, so private headshots never leave your device.
Crop a perfect circle, free
Round frame, transparent PNG export, no signup. Your photo stays on your device.
Try the ArtsFlick Circle CropThe white-box trap (why your circle has square corners)
Here’s the mechanic behind the most-reported circle-crop problem. A circular crop doesn’t delete the corners; it makes them transparent. Transparency is a fourth channel of data (alpha) that only some formats carry. PNG and WebP carry it. JPG does not, and never has.
So when you export a circle as JPG, the format has nowhere to store “nothing here” and fills those pixels with a solid color instead, usually white or black depending on the tool. The circle is still perfectly cropped; it’s just sitting on a square card you can’t remove. We covered the same trap from the other direction in our guide to converting PNG to JPG, where choosing that fill color deliberately is the whole trick.
Profile picture sizes worth knowing
Most platforms display avatars as circles but accept square uploads, then mask them. Upload at these sizes and the mask has enough pixels to work with:
|
Platform |
Upload size (px) |
Displayed as |
|
|
320 × 320 |
Circle |
|
|
360 × 360 (min 180) |
Circle |
|
|
400 × 400 |
Circle |
|
X (Twitter) |
400 × 400 |
Circle |
|
YouTube |
800 × 800 |
Circle |
|
Discord |
512 × 512 |
Circle |
|
|
500 × 500 |
Circle |
Two practical notes. Upload square rather than pre-cropped circles where the platform masks anyway, since your PNG’s transparent corners get discarded by their processing regardless. And go bigger than the minimum: platforms downscale gracefully but never upscale well, a principle covered in our resizing guide.
Doing it in other tools
Browser tools are the fastest route, but the job exists everywhere and the concept never changes: make a round selection, then export to a format that holds transparency.
Photoshop
Select the Elliptical Marquee tool, hold Shift while dragging to force a perfect circle, then use Layer → Layer Mask → Reveal Selection rather than deleting the outside. A mask keeps the original pixels intact, so you can reposition the circle later. Save as PNG, not JPG.
Canva
The frame approach: search “frames” in Elements, pick the circular one, drag your photo into it. Canva crops to the shape automatically. On the free plan, download as PNG and tick “transparent background” if the option is available to you, otherwise the corners come through white.
PowerPoint and Google Slides
Genuinely useful when you’re already building a deck: insert the picture, then Picture Format → Crop → Crop to Shape → Oval (hold Shift for a true circle). Right-click and “Save as Picture” exports it as PNG with the transparency intact, which is a decent trick for team slides.
Phone
iPhone and Android photo apps generally don’t offer circular crop natively; the built-in editors crop rectangles only. A browser tool works fine on mobile, which is usually the fastest path from a phone photo to a round avatar without installing anything. The CSS border-radius route is worth knowing too if you’re a developer: for web display you can render a square image as a circle in the browser without editing the file at all.
Framing that survives the circle
Circles cut corners, literally, and the corners are where composition usually lives. Three habits fix the common failures:
- Eyes slightly above center. Centering the whole head makes the forehead dominate and pushes the chin low. Placing the eyes just above the circle’s midpoint reads as natural in every avatar I’ve cropped.
- Leave breathing room. A face that fills the circle edge-to-edge feels cramped at 40 pixels wide, which is how most people will see it. Frame from the shoulders.
- Watch the corners of the original. Whatever sits in the four corners of your square is exactly what the circle deletes. Check that nothing important (a hand, a logo, the edge of a subject) lives there before you export.
Beyond profile pictures
Round crops earn their keep in more places than avatars. Team pages read as more designed with circular headshots than with a grid of rectangles. Testimonial blocks use them to separate a face from a wall of text. Product galleries use circular cutouts for color or material swatches. Logos and app icons frequently need a round version alongside the square one.
The rule is the same everywhere: a transparent PNG drops onto any background, any color, any section, without a visible card behind it. That’s the whole point of doing it properly.
One workflow note for websites specifically. If the round images are decorative and live on a page you control, cropping the file isn’t always necessary; displaying a square image inside a circular container achieves the same look and keeps the original intact for other uses. Crop the actual file when the image travels (avatars you upload to platforms, images pasted into documents or decks) and use display-side rounding when it stays on your own page. Either way, keep the master square file archived, because a circle can always be cut from a square, but a square can never be recovered from a circle.